Using Natara Bonsai with WorkFlowy

Natara Bonsai has long been my favourite outliner, but in the last couple of years it has been gradually displaced in my daily use by WorkFlowy, mainly because WorkFlowy syncs automatically and seamlessly across all my devices using different platforms, which is very useful for capturing notes and todos and having them always available.

Nevertheless, there are situations where Natara Bonsai is still my go-to choice. For example, when I need to organise, analyse, sort and resort large lists, or when I need to hierarchically structure some complex information, where it helps that different hierarchical levels can be displayed in different colour, to guide the eye.

Fortunately it is very easy to get information from Natara Bonsai back into WorkFlowy. All you need to do is install the OPML export template from the CarbonFin website (instructions available there), then export the Bonsai outline as a .opml file, open the .opml file using your favourite text editor (for this task I like to use Notepad++), and simply copy and paste the contents of the .opml file directly into a WorkFlowy bullet point. WorkFlowy will not only preserve the outline hierarchy but it will also display any Bonsai outline item notes as inline WorkFlowy notes.

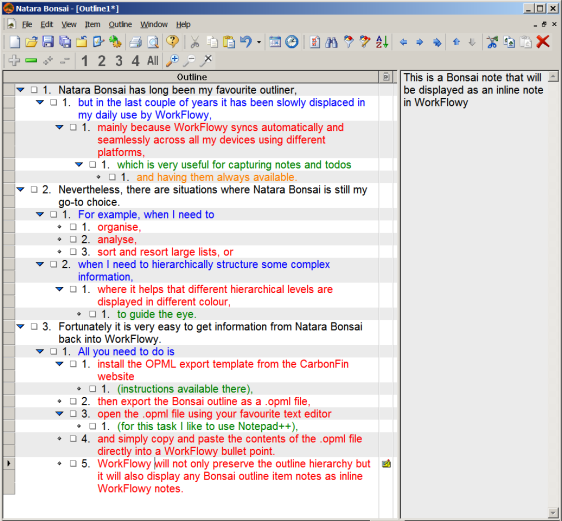
Here is a Bonsai outline (the final bullet point has a note, displayed in the pane on the right):
Natara_Bonsai_12_03_2016

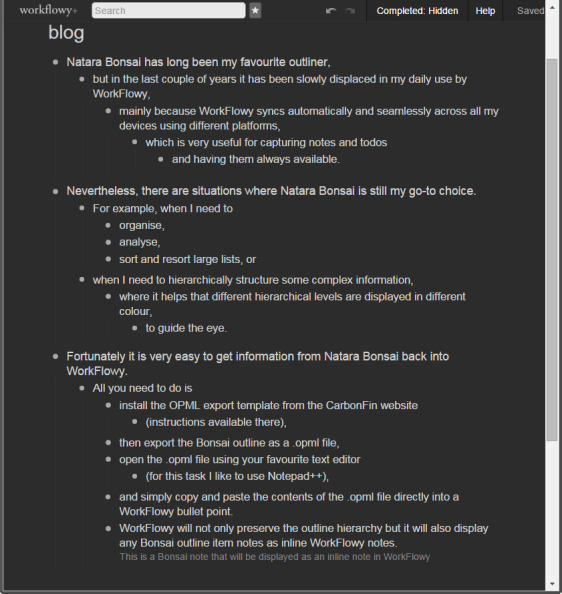
And here it is after having been pasted into WorkFlowy (note the inline note under the last bullet point):
WorkFlowy_screenshot.png

Addendum:

Frank Degenaar points out in the comments section that it is possible to add colour to a WorkFlowy outline as well, using the “Painter for WorkFlowy” Chrome add-on and some stylesheets using the “Stylish” add-on. That is definitely true and I do make use of those tools in my WorkFlowy all the time. It would only take me a minute or two to reconstruct the colour scheme of the above Bonsai outline in WorkFlowy, and the two would look fairly similar (especially if I change the dark WorkFlowy theme to a light one).

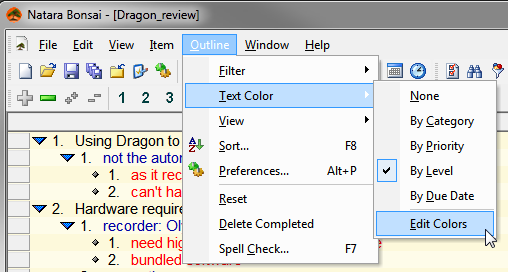
However, the colouring-in capability of Natara Bonsai works quite differently from that of WorkFlowy and serves a different purpose. You can set up Bonsai so that it automatically colours in your outline items according to the outline level position they occupy. This means that if you promote or demote an outline item, its colour will change accordingly and automatically.

While it is possible to retrospectively colour in a WorkFlowy outline by adding a colour tag to each item individually and manually (which would be time-consuming in the case of very large and multi-level outlines), these colours will not change when you demote or promote these items, as their colour tags will travel with them.

The  key point here is that when using Bonsai, the colour scheme has already been set up as default (using the procedure I described earlier), so I don’t have to pay any attention to the colouring-in, it just works automatically as I type away and keep promoting and demoting items. In contrast, with WorkFlowy the colouring-in needs to be done manually, individually for each item, and retrospectively, after the item has been added, and it does not change, if I move the outline items, thus breaking the logic of the “colour by hierarchy level” scheme.

This difference becomes significant when you want to work on large and complex lists and you want to pay attention to the text, rather than be disrupted by the mechanics of colouring-in. Bonsai just allows you to work faster, without having to make decisions about and fiddle with every single item, as you would have to in WorkFlowy.

By the way, as I have already explained in that earlier post, it is possible to use other criteria for the automatic colouring in Bonsai, such as category, priority or due date.
PhraseExpander Pro (v. 4.3.0.1) can now detect typing position in browsers

Since October 2013 I have been using PhraseExpander Pro v. 3, and then  v. 4, on a daily basis. (I have discussed the reasons for switching to PhraseExpander before here, and I also mentioned some crucial improvements to its algorithm here.) PhraseExpander has become an essential part of my writing setup, and not only because it is triggered by every single keystroke I type (though that is an important part of it). I use its SmartComplete feature not only to reduce the amount of repetitive typing, but also to help me remember long strings of coding (e.g. the HMTL code for inserting images or highlighting text in Gingko) and the aliases for anonymised people and organisations in my research.

In this post I just wanted to point out an improvement that was released in today’s version of PhraseExpander and which greatly improves the way it works in browsers. In previous versions the SmartComplete box would need to be manually positioned, and it would be stuck in the same position, regardless which part of the browser you were writing in. But in v. 4.3.0.1 now the SmartComplete box pops up right by the cursor, which makes it a great deal easier to use in a browser. This will be extremely useful when writing in an online service such as Gingko app, where different cards reside in different parts of the browser. Below is a screenshot of PhraseExpander’s SmartComplete box displayed by the cursor in Gingko in Firefox. I also tried it in Chrome, and it works the same. See the rest of the latest changes to PhraseExpander here. PhraseExpander with Gingko in FirefoxP.S. In the meantime I have discovered a number of other important benefits to the new handling of browsers in PhraseExpander. Now the SmartComplete box is displayed correctly in Chrome apps as well (i.e. standalone Chrome applications that can run offline), such as the one for WorkFlowy, which I use daily. Also, it can now be used more easily with Google Sheets and Google Docs, and to write emails in browser-based email services.

My current task management “system”

I’m just taking a moment here to reflect how I manage my to-dos these days. I’m not saying this is a great system. But currently it works for me. I work with three monitors on my desk. In the left monitor I have Firefox open with four tabs open all the time. I switch the monitor on and off, as needed. For times when I’m not at my desk, I have an iPod Touch and an iPad, which form part of the system.

The first open tab in Firefox has Google Calendar in Week view. The calendar contains all appointments, recurrent tasks (such as payments I need to make), and other important tasks that must be done at a particular day and time. It is not for managing small or detailed tasks or tasks that have not been allocated to a time coordinate. All Google Calendar tasks have an automatic alert set up to warn me 10 minutes before the task is due. These also go off on my iPod and my iPad. I can’t miss them.

In the second tab I have a Google Doc/Drive spreadsheet open called “Productivity.” Here I manually log how many Pomodoros I had done each day, how long they’d lasted, and what task I had accomplished (in one word, such as “writing,” “editing” etc.). At the end of the day I add up the Pomodoros to count how many “pure productive hours” (all work time excluding breaks) I had done. I know that I can do roughly 4 “pure hours” of writing a day, and so if I had done less, I push myself to try to achieve that goal. If I’m writing, I also record the word count I had done during each Pomodoro. To time my Pomodoros, I use an iPod app called Repeat Timer.

In the third tab I have WorkFlowy open. It has become an absolute life-saver for me. I was able to consolidate all my other to-do lists that I used to keep in a variety of iPod/web apps before. But WorkFlowy is more than just a to-do manager. It is also a project management tool for me, as it allows me to break down tasks ad infinitum (what’s called a “work breakdown structure” in project management). And it is also an outliner. As a PhD student, many of my tasks are writing-related, and so often a to-do is actually a writing task of some sort. WorkFlowy is an amazingly flexible tool for managing infinitely long lists and infinitely deep hierarchies. And it’s also a note-taking application for me, for taking very short notes. The iPod and iPad apps are particularly helpful for taking notes on the go, and they are synced automatically with the web version.

My fourth tab is a new experiment. I started a project plan in Gingko (which is a very funky horizontal outliner and more), using the month > week > day structure described here. This project plan is purely for planning and tracking the writing of my PhD, and I am planning and recording only the big chunky tasks that I want to accomplish each day. So it could be just one big task, or 3 or 4 smaller tasks, but never more. The point is to have a  bigger picture of my overall project and the bigger daily tasks. Most directly this Gingko “calendar/journal” has replaced Classic Calendar for me for this kind of day-to-day planning and tracking. Classic Calendar is great, but Gingko is somehow more fun to use, and its Markdown code allows me to create checkboxes and cross tasks off, which was not possible in Classic Calendar, and is something I find very satisfying for some reason.

The final piece of my task management jigsaw puzzle is iDoneThis. They send me an automatic email at the end of every day to ask me what I had done today, which gives me an opportunity to reflect on what happened today and take stock of my progress. The email gets converted to a task list on their web-based calendar, which can be downloaded in text form.

Looking at my “system” above, I have just noticed that I seem to be moving more and more towards minimalist, text-based solutions. Other than Google Calendar, all the services I use are black and white or grey, and the content can be exported in basic text form. That should help with archiving the data and making it sure that it remains easily readable for some time to come.