Natara Bonsai has long been my favourite outliner, but in the last couple of years it has been gradually displaced in my daily use by WorkFlowy, mainly because WorkFlowy syncs automatically and seamlessly across all my devices using different platforms, which is very useful for capturing notes and todos and having them always available.
Nevertheless, there are situations where Natara Bonsai is still my go-to choice. For example, when I need to organise, analyse, sort and resort large lists, or when I need to hierarchically structure some complex information, where it helps that different hierarchical levels can be displayed in different colour, to guide the eye.
Fortunately it is very easy to get information from Natara Bonsai back into WorkFlowy. All you need to do is install the OPML export template from the CarbonFin website (instructions available there), then export the Bonsai outline as a .opml file, open the .opml file using your favourite text editor (for this task I like to use Notepad++), and simply copy and paste the contents of the .opml file directly into a WorkFlowy bullet point. WorkFlowy will not only preserve the outline hierarchy but it will also display any Bonsai outline item notes as inline WorkFlowy notes.
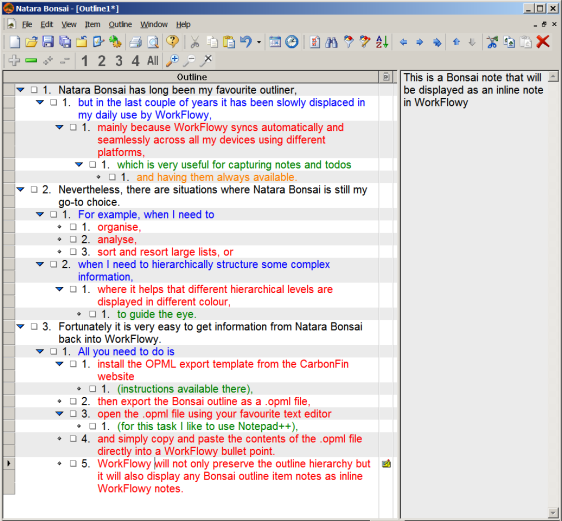
Here is a Bonsai outline (the final bullet point has a note, displayed in the pane on the right):
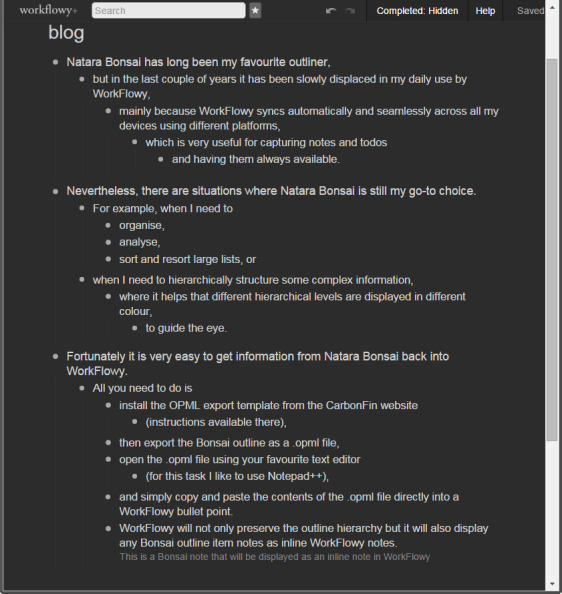
And here it is after having been pasted into WorkFlowy (note the inline note under the last bullet point):
Addendum:
Frank Degenaar points out in the comments section that it is possible to add colour to a WorkFlowy outline as well, using the “Painter for WorkFlowy” Chrome add-on and some stylesheets using the “Stylish” add-on. That is definitely true and I do make use of those tools in my WorkFlowy all the time. It would only take me a minute or two to reconstruct the colour scheme of the above Bonsai outline in WorkFlowy, and the two would look fairly similar (especially if I change the dark WorkFlowy theme to a light one).
However, the colouring-in capability of Natara Bonsai works quite differently from that of WorkFlowy and serves a different purpose. You can set up Bonsai so that it automatically colours in your outline items according to the outline level position they occupy. This means that if you promote or demote an outline item, its colour will change accordingly and automatically.
While it is possible to retrospectively colour in a WorkFlowy outline by adding a colour tag to each item individually and manually (which would be time-consuming in the case of very large and multi-level outlines), these colours will not change when you demote or promote these items, as their colour tags will travel with them.
The key point here is that when using Bonsai, the colour scheme has already been set up as default (using the procedure I described earlier), so I don’t have to pay any attention to the colouring-in, it just works automatically as I type away and keep promoting and demoting items. In contrast, with WorkFlowy the colouring-in needs to be done manually, individually for each item, and retrospectively, after the item has been added, and it does not change, if I move the outline items, thus breaking the logic of the “colour by hierarchy level” scheme.
This difference becomes significant when you want to work on large and complex lists and you want to pay attention to the text, rather than be disrupted by the mechanics of colouring-in. Bonsai just allows you to work faster, without having to make decisions about and fiddle with every single item, as you would have to in WorkFlowy.
By the way, as I have already explained in that earlier post, it is possible to use other criteria for the automatic colouring in Bonsai, such as category, priority or due date.

