The fabulous online outlining and writing app Gingko is looking for beta testers for its desktop versions running on Windows, Mac, and Linux. I reviewed the online app back in 2013. See the Gingko blog for more information on Gingko Desktop and on how to sign up.
Tag Archives: Gingko
Planning a PowerPoint presentation in Gingko
I have just discovered another great use for Gingko, the horizontal outliner: planning PowerPoint presentations. Why not just use PowerPoint itself? There are a number of reasons. While PowerPoint is very good for presenting the end result, it is not so good for developing the content itself. Sure, you could start adding the content straight into the slides; however, if you still need to develop the conceptual side of your argument, you will find that PowerPoint is not the best place to work it out in.
Firstly, space on each slide is limited. You could try moving some of the expanding new material into the notes area below the slide, but then soon you will start losing contact with the text, as it will disappear under the fold–not to mention that you can only view the comments for one slide at a time. This will inevitably prompt one to move content into a new slide, and the dangerous proliferation of slides begins.
However, presentation time usually is also limited, which means that it would make more sense to determine the maximum number of slides up front, and stick to it religiously. This is where Gingko comes in. Let’s take the example of a 30-minute presentation. If you apply a rule of thumb that one slide will take about 3 minutes to present and explain, then you should have no more than 10 slides.
As Gingko index cards look very much like slides, it is easy to set up 10 blank Gingko cards sequentially in a column. As you start developing the content and find that you have more material than you can present in a single slide, you can start moving the less relevant material to linked cards in an adjacent column to the right. Gingko allows you to add as many linked cards as you like, in as complex a hierarchy as you like, while preserving the integrity of the original 10 slides.
The reason this works well for conceptual development is because you can see all the material laid out in front of you (as opposed to the single slide view in PowerPoint), and it is easy to move text and cards around as you are abstracting, reducing, organising, and synthesising. No matter how messy and complex your working-out process is, at the end the original slides will contain the essence of your project, assuming that you have stuck to your guns and avoided the temptation to add more new slides.
Think of the top 10 slides as the tip of the iceberg that contains all the essential information that needs to be presented. Everything under the water level is still important as supporting material, but it does not need to be featured in the slides themselves, considering that there wouldn’t be time to discuss them in the presentation anyway. The end of the process is just a simple copy-and-paste job from Gingko to PowerPoint, although you could also use some of the other more sophisticated export options available (Markdown, HTML, .docx, impress.js, or json).
Gingko app reviewed in The Chronicle
Natalie Houston, associate professor of English at the University of Houston, discusses Gingko app on the ProfHacker blog at The Chronicle of Higher Education.
Write in a New Way with Gingko
I’ve been using Gingko for a couple of weeks and really like it. I find it’s especially valuable for collecting ideas and notes about a topic and then developing more structured pieces of writing from them. As a spatial thinker, I often write ideas or paragraph stubs on index cards or half-sheets of paper and move them around on a table; this tool lets me integrate the same kind of planning with my writing process. I already do a lot of my work in plain text format, so I appreciate the ease with which Gingko exports files and integrates in to my existing workflow. Finally, although I certainly could (and often did, before finding this app) simply create a lot of individual text files as virtual “cards” on my desktop, the clean visual display that Gingko offers really appeals to me. This is the first digital tool that offers mindmapping-like features in what is for me a truly intuitive design. I’m going to continue using Gingko for my own work and look forward to its continued development.
Going gung-ho with Gingko, the horizontal outlining app
I’ve tried a wide range of outlining and writing tools for Windows over the last few years, in preparation for the big task of writing up my doctoral thesis, so I managed to surprise even myself when after all that careful consideration I chose a web-based tool that I have only found out about barely a month ago. But when push came to shove, and I had to start writing according to a regimented writing schedule, I opted for the newcomer called Gingko app over my old-time favourites oft discussed here.
It is actually not that easy to describe with one concept what type of an application Gingko is exactly, as it cuts across a number of categories (which surely must be a sign of greatness:). What is special about Gingko is the way these disparate features are brought together. As I’m primarily interested in academic work, and more specifically in outlining and writing, for me Gingko is an outliner and a writing app. But even before I began to use it as such, I was already using it as a project planning and task management app. This might give you an idea of its versatility.
Let me focus on Gingko’s outlining and writing capabilities for now. It allows you to outline your writing in virtual index cards, in which your text can be as short or as long as you like, and which can be joined together vertically and horizontally to form columns and rows. The cards can also be freely rearranged on a virtual and more or less infinite ‘corkboard.’
Now you might say that there are some other index-card-based software out there, such as those targeting fiction writers, or that there are other virtual corkboard software where you can freely position your notes and even link them with arrows and such. Or you might say that these rows and columns sound and look just like MS Excel or tables in Word.
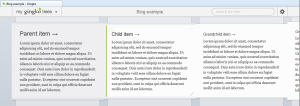
But this is where Gingko’s magic kicks in. It doesn’t just connect these cards in the manner of a spreadsheet or a table. Gingko in fact is a horizontal outliner. This means that e.g. when you attach a new card to an already existing card horizontally, together they are starting to form a branch within a hierarchical outline. The card on the left becomes a parent, and the card on the right becomes the child, and so on, ad infinitum.
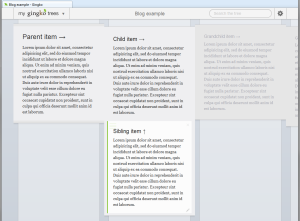
But it gets even better. If you now add another card below that child, within the same column, the new card becomes a sibling of the card above, and another child of the aforementioned parent.
Now you might wonder: how do multiple clusters of cards connected across both columns and rows can possibly fit in the same space, if they have a different number of cards all connected in different formations? After all, outlines don’t usually have the same number of children and siblings under each parent. This is where the second bit of magic happens. When you click on any of the cards, the card and its entire cluster of parents, grandparents, siblings, children and so on rotate into view through an ingenious mechanism that works a bit like a “fruit machine” (if you’re reading this in British English), or like a “slot machine” (if you’re reading this in North-American English). The same happens if you are navigating with the keyboard arrows. It’s an incredibly clever way to navigate such a complex arrangement.

Clicking on “Parent 1 item” rotates its branch into view and centres it, highlighting all connected offsprings
You might still ask: but what is the advantage of writing in such an application? A horizontal outline after all is just like a vertical outline, except it is laid out horizontally… But Gingko is not only a horizontal outliner. As it utilises Markdown, you can add six levels of headings anywhere in the text, which means that you can also do ‘vertical’ outlining, by promoting and demoting the text within a card (or the card itself) without having to actually move the card anywhere. E.g. by adding a Level 1 heading to a card, and a Level 2 heading to its sibling connected from below, the second card now also becomes the child of the card above (while remaining a child of any card to which its “sibling-parent” is connected on the left).
I put ‘vertical’ above in quotation marks, as—and this might sound a bit confusing initially—you can also apply this parallel or ‘vertical’ hierarchy horizontally, across the columns.
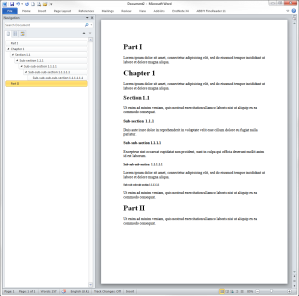
The Markdown headings are the same thing as headings in MS Word, and if you export a Gingko tree (as a Gingko document is called) as HTML and copy and paste it into Word, the headings will be automatically converted into Word headings. There is another bit of Gingko magic to exporting: horizontal and vertical hierarchies and the Markdown headings (as long as you’ve used them consistently) are all neatly arranged into a single, classical (yes, vertical) hierarchy of headings in the exported document.
But I still have not mentioned the killer feature of Gingko. Although the cards are horizontally connected through the “slot machine” mechanism, you can also ‘deactivate’ this hierarchical connection by simply scrolling away to any note in the other columns, while carrying on writing in your centred index card in your focal column. It is immensely useful to be able to call up a note that otherwise might be connected to an entirely different and distant part of the hierarchy, and view it side-by-side with the index card you happen to be editing. If you were using a traditional vertical outliner, you would have to abandon the text you are writing to scroll up or down and drill deep into branches to look for your note, losing both your original place in the outline and your train of thought.

While the edited card remains centred in column 2, the cards on the left and the right are “scrolled up” to be displayed alongside it for reference
There is a lot more to say about Gingko, but I’ll keep that for another post. In the meantime, do check out Gingko’s blog and their Youtube video, as they offer many other user case scenarios.
Update (14-Oct-13):
In response to a reader’s query, here is how to emulate a footnote using the superscript tag with Markdown,
<sup>1</sup>
and the Level 6 heading with Markdown, which produces small font suitable for a footnote:
###### 1
The footnote area is separated from the body text by the horizontal line:
---
Here is a screenshot of the card in view mode:
And here is the same card in edit mode (the English spellchecker in my Firefox went a bit crazy with the Latin text :):
My current task management “system”
I’m just taking a moment here to reflect how I manage my to-dos these days. I’m not saying this is a great system. But currently it works for me. I work with three monitors on my desk. In the left monitor I have Firefox open with four tabs open all the time. I switch the monitor on and off, as needed. For times when I’m not at my desk, I have an iPod Touch and an iPad, which form part of the system.
The first open tab in Firefox has Google Calendar in Week view. The calendar contains all appointments, recurrent tasks (such as payments I need to make), and other important tasks that must be done at a particular day and time. It is not for managing small or detailed tasks or tasks that have not been allocated to a time coordinate. All Google Calendar tasks have an automatic alert set up to warn me 10 minutes before the task is due. These also go off on my iPod and my iPad. I can’t miss them.
In the second tab I have a Google Doc/Drive spreadsheet open called “Productivity.” Here I manually log how many Pomodoros I had done each day, how long they’d lasted, and what task I had accomplished (in one word, such as “writing,” “editing” etc.). At the end of the day I add up the Pomodoros to count how many “pure productive hours” (all work time excluding breaks) I had done. I know that I can do roughly 4 “pure hours” of writing a day, and so if I had done less, I push myself to try to achieve that goal. If I’m writing, I also record the word count I had done during each Pomodoro. To time my Pomodoros, I use an iPod app called Repeat Timer.
In the third tab I have WorkFlowy open. It has become an absolute life-saver for me. I was able to consolidate all my other to-do lists that I used to keep in a variety of iPod/web apps before. But WorkFlowy is more than just a to-do manager. It is also a project management tool for me, as it allows me to break down tasks ad infinitum (what’s called a “work breakdown structure” in project management). And it is also an outliner. As a PhD student, many of my tasks are writing-related, and so often a to-do is actually a writing task of some sort. WorkFlowy is an amazingly flexible tool for managing infinitely long lists and infinitely deep hierarchies. And it’s also a note-taking application for me, for taking very short notes. The iPod and iPad apps are particularly helpful for taking notes on the go, and they are synced automatically with the web version.
My fourth tab is a new experiment. I started a project plan in Gingko (which is a very funky horizontal outliner and more), using the month > week > day structure described here. This project plan is purely for planning and tracking the writing of my PhD, and I am planning and recording only the big chunky tasks that I want to accomplish each day. So it could be just one big task, or 3 or 4 smaller tasks, but never more. The point is to have a bigger picture of my overall project and the bigger daily tasks. Most directly this Gingko “calendar/journal” has replaced Classic Calendar for me for this kind of day-to-day planning and tracking. Classic Calendar is great, but Gingko is somehow more fun to use, and its Markdown code allows me to create checkboxes and cross tasks off, which was not possible in Classic Calendar, and is something I find very satisfying for some reason.
The final piece of my task management jigsaw puzzle is iDoneThis. They send me an automatic email at the end of every day to ask me what I had done today, which gives me an opportunity to reflect on what happened today and take stock of my progress. The email gets converted to a task list on their web-based calendar, which can be downloaded in text form.
Looking at my “system” above, I have just noticed that I seem to be moving more and more towards minimalist, text-based solutions. Other than Google Calendar, all the services I use are black and white or grey, and the content can be exported in basic text form. That should help with archiving the data and making it sure that it remains easily readable for some time to come.


