Kami or Squid for annotating PDFs with stylus on a Chromebook? Mini Review

Recently I got myself a Samsung Chromebook Pro (which comes with a Wacom EMR stylus), and I was looking for apps to annotate PDFs with a stylus. In the end Kami (formerly Notable PDF) and Squid (formerly Papyrus) emerged as top contenders. It’s not entirely a fair comparison, as one is a Chrome extension, the other an Android app, and I used two different PDF files to annotate, but here are my main observations.

Where Kami is better:

  • If you have the Kami Chrome extension enabled as your default PDF reader, you can start annotating as soon as you download a PDF file, as it opens automatically in Kami, with all the annotation tools ready. With Squid it’s a few more steps, as you need to save the PDF first somewhere where Squid can import from (local download folder, Google Drive, Box, or Dropbox), then launch Squid, hit the new note button, choose “Import PDF”, and then navigate to the PDF file to import it.
  • In Kami you can scroll through the entire PDF file during annotating. In Squid, you can only see one page at a time, and you can move forward or back by only one page at a time.
  • As long as you are online, Kami syncs every change instantly to Google Drive, so you have a backup copy, should anything happen to the local device, and can have multiple copies open and synced live on multiple devices (and possibly multiple users, if you’re sharing your PDF file with others). In Squid, there is no sync. Instead, there is a “Cloud backup” option, which only works with Box and Dropbox, and there is only an option to back up every 6 hours or manually. There is also an “Export PDFs” option, which can similarly be set to “every 6 hours” or be triggered manually. In my experience, the Squid backup was not very reliable. Sometimes it failed to upload the backups (blaming it on “network errors,” “I/O errors” and so on), sometimes it only uploaded some of the files, and Box for some mysterious reason failed to sync the files with its Windows client on my laptop. For Chromebook users there are obvious benefits with Kami being so seamlessly integrated into the Chrome browser and Google Drive, and not having to pay for Box or Dropbox. But the instant sync notification in Kami can be a bit distracting during reading and annotating.
  • In Kami you can choose not to use your fingers at all and use the stylus for scrolling and all other actions, if you don’t want to be touching the screen.
  • Kami maintains zoom level as you scroll through the document, while in Squid you need to reset the zoom level each time you navigate to the next page or back.
  • Using Kami to annotate PDFs leaves Squid free for taking additional handwritten notes, and it is easy to switch between Kami and Squid via the shelf. If you’re annotating a PDF in Squid, it is more awkward to switch to another Squid note, as you need to exit each in order to be able to navigate to the other.
  • Kami’s tools (which are in a vertical bar on the left of the screen) are a bit more easily accessible (especially for a left-handed person), and it’s easier to switch between e.g. the pen tool and the highlighter, than in Squid, where the tools are in the top right corner (which right-handed people might still find easier).
  • In Kami it’s possible to scroll the page with a single finger, while in Squid you need to use two, otherwise you end up erasing your annotations. Unfortunately, this can still happen if your two fingers are not entirely in sync, and you accidentally erase stuff in Squid while trying to scroll up or down the page.

Where Kami could improve:

  • While Kami does work offline, the “undo” button is obscured by the offline notification tooltip, so “undo” cannot be accessed in offline mode.
  • When switching between tools, the tooltip labels for the tools (e.g. “Drawing”) persist, intruding into the margin that could be used for annotations, so you need to scroll up or down to be able to annotate on that spot. I don’t see any value in these tooltips persisting (and any need for them at all).
  • Normally when you start annotating a newly opened PDF in Kami, there is a popup asking you if you want to save it to Google Drive for syncing. This is a nice feature when you’re online, but if you happen to get it when you’re offline, the popup persists and is impossible to close, obscuring a part of the PDF, which is pointless and annoying. Even when the internet connection was re-established, I could only get rid of it by refreshing the whole page and reloading the PDF. It looks like a bug.

Where Squid is better:

  • There is no distracting sync notification (but there is no sync either).
  • The exported PDF is properly flattened, meaning that when you open it in another PDF viewer on another operating system, the annotations are fixed, and you can freely copy and paste text from the PDF, without interfering with the annotations, or the annotations interfering with the copying. Kami’s exported PDF on the other hand does not properly flatten the annotations, meaning that they remain floating objects, so if you e.g. want to copy some text from the PDF, you can accidentally start dragging the annotations out of place. Personally I can put up with this (and just use the clean version of the PDF file for any copying), but it could be a problem if someone else might need to read your annotations, and they might unwittingly drag them out of place. Also, Squid’s PDF export was PDF/A-1b standard compliant. But I don’t know if that had something to do with the underlying PDF file and not Squid.
  • Squid (at least on my Samsung CBP) had pressure sensitivity, which meant that annotations could be done in thinner handwriting than in Kami. In general Squid allows for more granularity in stroke thickness etc.
  • While I used different files to annotate for this review, so this information is not directly comparable, it seemed that Squid’s annotations required less overhead in terms of increase to the file size. After annotation, the PDF in Squid increased from 376KB to 791KB in size, while in Kami it increased from 364KB to 6.31MB. For this to be a fair comparison I should have made the exact same annotations to two copies of the same file, but on the whole it suggests that Squid is more economical with its use of data.

Verdict

For now I will probably stick with Kami, as I like the live Google Drive sync, I like the fact that I can scroll through the entire document, and that I don’t risk deleting annotations if I use my finger to scroll up or down. I also like the option of being able to use Kami and Squid together, annotating in the former, and taking additional handwritten notes in the latter. These benefits for me outweigh the negative points about the floating annotations and the big increase in file size.

Update (27 May 2018):

I have also posted this review on the Chrome OS Reddit site, and there was a bit of a discussion.

Solving writing problems by physically pushing through and letting yourself go

I don’t know if this is just me, but I find that certain writing problems (such as difficult conceptual problems that produce a writer’s block because they prevent you from progressing and altogether are putting you off the writing process) can only be solved by physically pushing through, by which I mean pushing your body (and mind) substantially beyond its comfortable limits.

I am something of a health fanatic. I’m careful about what I eat, I monitor my weight, and I exercise daily. But I find that when it’s crunch time, and I need to deliver the goods (which means coming up with a new contribution to knowledge as an academic, i.e. as a professional writer), the solving of some problems (and the meeting of my deadlines while producing a piece of work that is of sufficient quality to be accepted as an internationally competitive piece of research, as defined and required by my particular academic community), necessitates the abandoning of my healthy habits.

I end up having to work longer hours, exercise less, eat food that I otherwise wouldn’t touch, and put my body and mind under substantial strain (by sitting behind a desk far too long, staying up far too late, drinking far too much caffeine, eating far too many carbs), until I finally have an epiphany about how to solve the conceptual or practical problem, after which writing suddenly becomes a lot easier.

I feel this is a process of “letting go” of some things and liberating my mind to be open to some other things. It feels like achieving a moment of selflessness. Unfortunately this “letting go” is not just of the wholesome spiritual kind but also a “letting myself go” that quite quickly translates into additional inches to my waistline.

Maybe I just have to accept that the production of word count correlates with the production of body fat, and my goal should be to achieve a reasonably healthy balance between periods of productivity and periods of fitness across the year, so the latter can support the former, and that the former do not entirely overwhelm the latter.

What is particularly ironic about this situation is that the “physical” aspects of pushing through, and the resulting physical pain and after-effects in terms of weight gain, are due to the extreme reduction of physical activity (resulting from being stuck in the same position behind my desk for prolonged periods of time).

Do some outlining. Then outline some more…

I once more had to realise that when the writing is not going well, it might be because I haven’t figured out what I wanted to say, meaning that I probably need to do more outlining. So here is my freshly rediscovered rule of thumb: “when you’re stuck, when you got the writer’s block, just do some outlining. And then outline some more. And then some more.” And then you will know what to write about and how to organise your thoughts. In fact outlining is not only about developing the content but also deciding the order in which the content is going to be presented, i.e. the flow of logic, the order of presentation, and the structure of the content. All the more reasons to do some outlining, and then outline some more.

Using Natara Bonsai with WorkFlowy

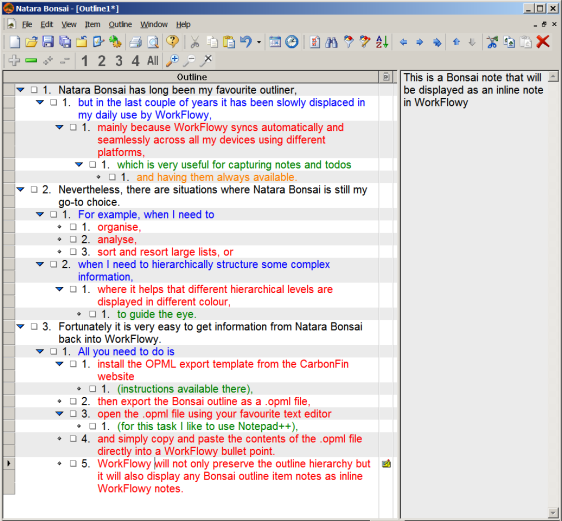
Natara Bonsai has long been my favourite outliner, but in the last couple of years it has been gradually displaced in my daily use by WorkFlowy, mainly because WorkFlowy syncs automatically and seamlessly across all my devices using different platforms, which is very useful for capturing notes and todos and having them always available.

Nevertheless, there are situations where Natara Bonsai is still my go-to choice. For example, when I need to organise, analyse, sort and resort large lists, or when I need to hierarchically structure some complex information, where it helps that different hierarchical levels can be displayed in different colour, to guide the eye.

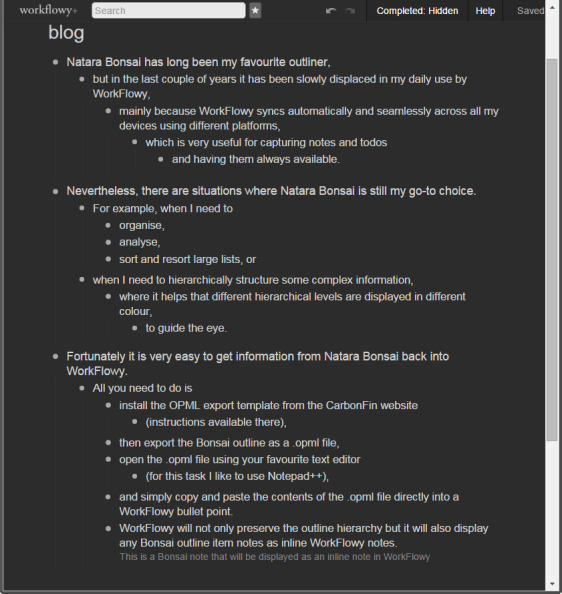
Fortunately it is very easy to get information from Natara Bonsai back into WorkFlowy. All you need to do is install the OPML export template from the CarbonFin website (instructions available there), then export the Bonsai outline as a .opml file, open the .opml file using your favourite text editor (for this task I like to use Notepad++), and simply copy and paste the contents of the .opml file directly into a WorkFlowy bullet point. WorkFlowy will not only preserve the outline hierarchy but it will also display any Bonsai outline item notes as inline WorkFlowy notes.

Here is a Bonsai outline (the final bullet point has a note, displayed in the pane on the right):

Natara_Bonsai_12_03_2016

And here it is after having been pasted into WorkFlowy (note the inline note under the last bullet point):

WorkFlowy_screenshot.png

Addendum:

Frank Degenaar points out in the comments section that it is possible to add colour to a WorkFlowy outline as well, using the “Painter for WorkFlowy” Chrome add-on and some stylesheets using the “Stylish” add-on. That is definitely true and I do make use of those tools in my WorkFlowy all the time. It would only take me a minute or two to reconstruct the colour scheme of the above Bonsai outline in WorkFlowy, and the two would look fairly similar (especially if I change the dark WorkFlowy theme to a light one).

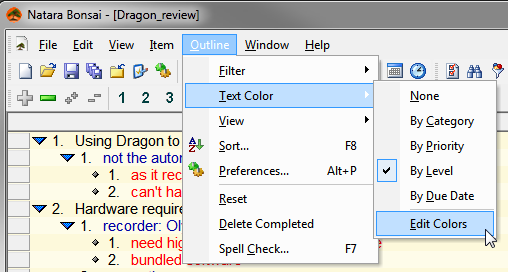
However, the colouring-in capability of Natara Bonsai works quite differently from that of WorkFlowy and serves a different purpose. You can set up Bonsai so that it automatically colours in your outline items according to the outline level position they occupy. This means that if you promote or demote an outline item, its colour will change accordingly and automatically.

While it is possible to retrospectively colour in a WorkFlowy outline by adding a colour tag to each item individually and manually (which would be time-consuming in the case of very large and multi-level outlines), these colours will not change when you demote or promote these items, as their colour tags will travel with them.

The  key point here is that when using Bonsai, the colour scheme has already been set up as default (using the procedure I described earlier), so I don’t have to pay any attention to the colouring-in, it just works automatically as I type away and keep promoting and demoting items. In contrast, with WorkFlowy the colouring-in needs to be done manually, individually for each item, and retrospectively, after the item has been added, and it does not change, if I move the outline items, thus breaking the logic of the “colour by hierarchy level” scheme.

This difference becomes significant when you want to work on large and complex lists and you want to pay attention to the text, rather than be disrupted by the mechanics of colouring-in. Bonsai just allows you to work faster, without having to make decisions about and fiddle with every single item, as you would have to in WorkFlowy.

By the way, as I have already explained in that earlier post, it is possible to use other criteria for the automatic colouring in Bonsai, such as category, priority or due date.

Natara Bonsai downloadable from the Internet Archive

I still get visitors coming to this site looking for the outliner Natara Bonsai almost daily, as I mentioned it occasionally that it was one of my alltime favourite pieces of software. Unfortunately the Natara Bonsai download page went down sometime in 2014, never to come back again. There is now only a placeholder page for the main Natara site that points to the Natara blog (the last post on which dates 6 June 2013).

A few months after the Bonsai site has disappeared, I stumbled upon some kind of a mirror site at http://64.226.29.51/Bonsai/Download.cfm where it was still possible to download the software from. I was very happy to share that link, and I got a few emails from Bonsai fans thanking me for it. Apparently Bryan Nystrom, the owner of Natara Software, Inc., was kind enough to sell them a licence.

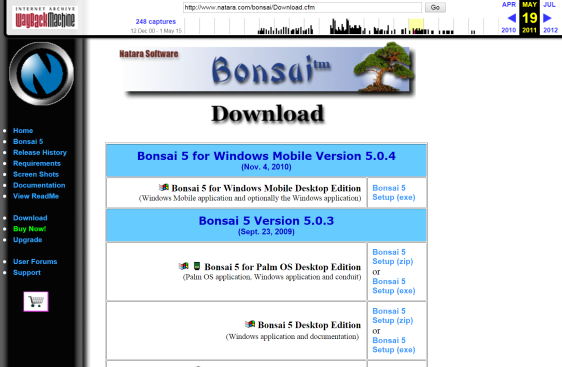
Alas, a few months ago this mirror site has also gone down. It seemed that Natara Bonsai was well and truly gone. I was kicking myself for not having taken some screenshots of that site at least, just as a keepsake (yes, that is how much I love this software). Then one day it occurred to me: what if there are some archival pages of the Natara site on the Internet Archive? And lo and behold, there indeed are a number of such pages. And not only that: the Bonsai files can still be downloaded from there! Here is one such link for instance: http://web.archive.org/web/20110519183308/http://www.natara.com/bonsai/Download.cfm

I cannot vouch for the safety of these files, so download and run them at your own risk. But chances are they might just be the original Natara Bonsai files. So fellow Bonsai fans, rejoice!

Natara_Bonsai_Internet_Archive_2011_05_19

Part 2 of an Interview with Mike & Jesse: WorkFlowy Features Present and Future

Workflowy

This is a guest post by Frank Degenaar (@ProMashUp), author of the book,“Do Way, Way More in WorkFlowy”.


This is the 2nd of a 2-part interview with Jesse Patel and Mike Turitzin, WorkFlowy’s co-creators. Mike and Jesse talk about WorkFlowy features, the inspiration behind it all and big dreams for the future. Get the first part of the interview here.

FRANK:Is there anything you can tell us about your inspiration for or any epiphany concerning WorkFlowy’s zoom? Would it be an overstatement to say that the ability to zoom into lists is WorkFlowy’s superpower?

JESSE: Zooming is definitely Workflowy’s superpower.

I tried a bunch of outliners before starting to work on it, and they all had the same problem: If you start a huge project in it, that has many big sub projects, which have many significant sub sub projects of their own, you quickly get to…

View original post 2,748 more words

WorkFlowy Co-Creators, Mike Turitzin & Jesse Patel on WorkFlowy’s Early Days

Workflowy

This is a guest post by Frank Degenaar (@ProMashUp), author of the book, “Do Way, Way More in WorkFlowy”.


This is the first of a 2-part interview with Jesse Patel and Mike Turitzin, WorkFlowy’s co-creators. Today’s post is a throwback to the early days of WorkFlowy’s ideation and inception… while the next post will take a look at some tougher questions about WorkFlowy’s vision and behind-the-scenes development. 

FRANK:I went fishing for WorkFlowy’s genesis and unearthed the following from a 2012 blog post elsewhere on the ‘net:

The idea for [WorkFlowy] grew out of Jesse Patel’s work at a nonprofit, “a job that was really overwhelming, where I had to manage a bunch of moving parts for 30 different projects.” While at that job, Patel tried many different programs to help him get organized. “The biggest problem with all of them is that they don’t support flexible data structures—they don’t…

View original post 2,346 more words