A large part of the academic writing process has to do with taking notes, collecting quotes, analysing and evaluating them, coming up with your own interpretation, then developing an outline, and finally writing up the material into a draft. I’ve experimented with various set-ups to tackle this process in the past that involved a lot of different pieces of software (see here and here). However, recently I’ve come up with a simplified workflow that ‘only’ requires three pieces of software: ConnectedText, Freeplane, and Outline 4D (aka StoryView).
- I import quotes and notes into ConnectedText (CT) as I’ve described elsewhere, using my latest reading notes template.
- As I am reviewing the document, I identify key quotes and notes that I would like to consider as material for the draft. When I come across an important or interesting quote or note, I select the text and type CTRL+ALT+/ to activate Manfred Kuehn‘s “copy to new topic with link” AutoHotkey script (see below), which copies the selected text, creates a new CT topic with it, and also inserts a link under the original text to this new topic.
- Simultaneously to this process I create an outline for the intended draft using CT’s own Outline tool. Whenever I create a new topic with a quote or note using the process described in point 2, I add a corresponding item to the outline and drag and drop this new topic on it, which creates a hyperlink between the outline item and the selected quote or note. Clicking on the outline item opens the corresponding quote.
- I export the CT outline as a Freemind (.mm) file and import it into Freeplane (a mind map application). The CT outline has been thus transformed into a mind map. Nodes with links remain clickable, which means that clicking on a particular Freeplane node with a link opens up the corresponding quote or note in CT. I can add further notes using Freeplane’s own Notes functionality and develop and restructure the outline, if I wish.
- When I’m finished with outlining and am ready to begin to write the draft, I tile Freeplane and CT vertically in my second (22in) monitor, so I can look at both the mind map (i.e. my outline) and the corresponding quotes and notes in CT. Effectively Freeplane and CT have been integrated to form a funky “dual-pane” outliner, where the first pane is a mind map, and the second pane is the viewer for the note/quote attached to individual mind map items.
- In my main monitor, I fire up Outline 4D (aka StoryView) and start writing my draft, while also using O4D’s outlining functionalities for almost real-time reverse outlining, i.e. as soon as I write a larger chunk of text, I add headings and sub-headings to it to crystalise the final implicit logical structure (outline) of the emerging draft. All the while I’m following and ticking off the branches of the mind map and copying across selected quotes and notes from the associated CT topics.

This workflow could of course be further simplified, as you could simply use CT’s Outline pane and its view pane as the dual-pane outliner in steps 4 and 5, altogether leaving out Freeplane. However, the benefit of using Freeplane is that it gives an airier spacial view of the outline and it also has its own inline note capability, which CT’s Outliner doesn’t have.
As for step 6, you could use any old word processor or editor to complete the writing. However, I find that the draft usually develops its own implicit logical structure which won’t be identical to the one in the mind map. To put it differently, there is still abstraction and conceptual development taking place during the writing process and not everything in the mind map will make it into the draft. New ideas may emerge from the draft as well. Hence it’s necessary to engage in reverse outlining to keep track of the emerging logical structure.
I did try to use MS Word 2010 with its navigation pane for this (by using headings), however I found that Outline 4D as a single-pane outliner with inline note capability was better suited to the task of real-time reverse outlining, thanks to its multiple options to collapse different sections or view only headings or only text or a custom-mix of both.
Here is Manfred’s AHK script. If you haven’t used AHK before: 1) download, install and run AutoHotkey_L on your PC; 2) create a new text document in Notepad (or your favourite text editor – I use NoteTab); 3) copy and paste the script below; 4) save the text as e.g. “copy_to_new_topic.ahk” on your desktop; 5) run it by double-clicking its icon; 6) use it by selecting the desired text in CT, typing CTRL+ALT+/ and then naming and saving the new topic.
By the way, you could also just use CT’s own built-in “cut to new topic” (CTRL+ALT+N) command, which does not require AutoHotkey and which also leaves a link behind in the original topic. However, I prefer to use this “copy to new topic” AHK script because I want to preserve the integrity of the original document (which e.g. could be the full text of an academic article).
;---------------------------
; Copy to new topic         |
;---------------------------

^!/:: ; copy to new topic

clibboard =
Send ^c
InputBox, OutputVar, Topic Title, Enter the title of the new topic:
if ErrorLevel <> 0
{
     MsgBox, You cancelled
     return
}
else
{
     WinActivate, ConnectedText
     SendInput {Right}%A_SPACE%
     SendInput `[`[%OutputVar%`]`]
     SendInput !t
     SendInput %OutputVar%`n
     IfWinActive, Confirmation
           return
     else
           SendInput ^v!e
     return
}
return
Update (24/01/2013)
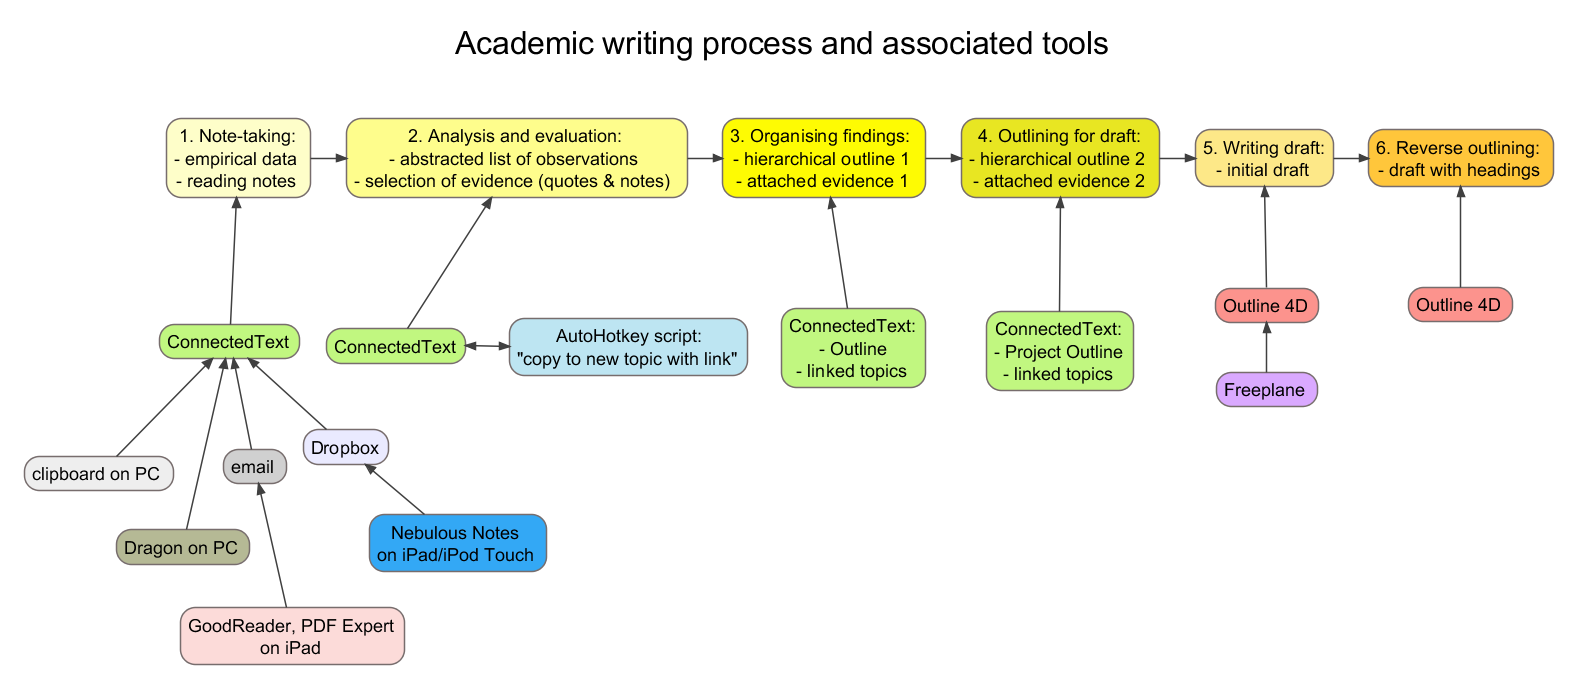
Here is a visual representation that summarises my academic writing workflow with the associated tools. It should be read in light of my additional comment below (i.e. there are two different types of outlines and sets of evidence represented). I have also included the tools that I use for note-taking (step 1).

Pingback: Outline 4D for drafting and reverse outlining | Dr Andus's toolbox
I’m starting to think that I may need to distinguish between two different types of outlines in the above workflow. First I would be developing an outline in CT’s outliner pane to organise the various textual fragments (quotes and notes created with the “copy to new topic with link” AHK script) thematically. This could be one or more outlines, depending on the size of the project (whether it’s for a 10,000-word paper or an 80,000-word dissertation or book) and the number of large, distinct themes.
The second type of outline would be the outline for the draft that needs to be written. This could be constructed in CT’s Project Outline pane (it’s fortunate that CT has two outliner panes and they can be viewed simultaneously). This outline would only contain a small selection of the notes and quotes (text fragments) organised in the first type of outline. This situation comes about because usually there is far more material than what can fit into a final draft. You can have 10 equally interesting quotes but in the end you will only be able to fit in one or maybe even that one will need to be paraphrased to save space.
It would be this second (final) outline that would be exported into Freeplane, to create the virtual two-pane outliner where the left pane is a mind map and the right pane is for viewing notes that are linked to the nodes of the mind map. I like to view my final outline as a mind map because it is easier to visualise the structure of the argument and also to ignore branches that are too detailed to discuss at length.
Then while I view the Freeplane+ConnectedText screen, in my other monitor I write the final text and copy and paste relevant quotes etc. from CT into Outline 4D, where I can also carry out reverse outlining as I go along. This setup also allows me to carry out further abstraction and reduction of the material, every time the text gets transposed into a new form (from the original text to outline items, mind map nodes, quotes and notes as inline notes, and finally as sentences and paragraphs, supported by quotes as evidence).
Note that this system also enables me to trace back every sentence to my original source, as a mind map node would have a hyperlink to a textual fragment in CT, which has a link back to its source text. This is very important and useful for being able to check the integrity of your arguments.
Cool.
I’ll have to try your approach with ConnectedText, instead of the Xampp server, which I run in a ram-drive. My current server solution “might” be better for teamwork (multiple user accounts), so you can use it through LAN or the web. I guess ConnectedText can use Dropbox for a similar purpose.
Xampp does require more initial work, but it’s open source, and you can run it on: Mac, Win, and Linux. A portable web-server that you can carry with you, or store in the cloud, one mysql import away from whatever OS you need. I’m conflicted.
You might also want to look into http://www.zotero.org it simplifies sources, and management.
Thanks for an interesting article.
Hi Paul – thank you. Also thanks for the Xampp suggestion. I did take a quick look but it looks like it’s beyond my technical abilities at the moment. I do like Zotero, though I don’t have much need to use it at the moment.
There is some discussion in the CT help file and on the CT forum on how to use it with Dropbox.
As for the AHK script above, there is also a version on the CT forum which does not create a link between the original CT topic and the new topic. The advantage of that one is that you can use it globally, i.e. copying text from any other application (not just CT) and pasting it into a newly created CT topic.
Pingback: My daily readings 01/21/2013 « Strange Kite
Pingback: Academic writing process and associated tools | Dr Andus's toolbox
Pingback: Multiple topic windows in ConnectedText 6 | Dr Andus's toolbox
Pingback: Getting started with ConnectedText | Dr Andus's toolbox
Interesting. I gonna study the options you propose. I am actually using Docear for the process of taking notes out of bibliography (but parallel free plane just for thoughts and structure), then pass it in free plane to review and make a final structure, then I write that down with WriteRoom (for I use LaTeX for all the formatting)
greetings
I have to admit that I did not stick with the above process very long. There were two problems with it. First, I discovered that it would be better for me to record my reading notes in Freeplane as a mind map hierarchy as I go along (rather than doing the organising of the reading notes after the reading has finished), in order to more accurately capture the original text’s own logic. I still import this text into CT, as my final database. Secondly, I’d abandoned the above process as I find it too fiddly and slow to create a new topic for every quote (to title it, add categories etc.) in CT. Instead, I prefer to import my reading notes for a text as a single CT topic. Less work, and easier to search with incremental search etc. I also prefer to do my outlining for my own writing in Freeplane, as a mind map’s landscape view is easier to take in than a traditional vertical outline. As for my final writing, I either dictate into WriteMonkey (using Dragon), or write in Gingko or Outline 4D. So my overall process is not that different from yours. Docear looks good, I might try to see if there are any benefits in organising my initial reading notes as mind map in it, instead of Freeplane. And LaTeX is on my todo list to learn…